数组原生的方法产生的数据更新原本来说,是不会在使用Vue时发生响应式变化的,而我i们使用push,pop等方法实际上是因为Vue对这些方法做了一层封装,其基本的实现路径如下:
首先,包装监听的过程位于源代码文件夹中的\src\core\observer\array.js部分:
 1 import { def } from '../util/index'
 2
 3 const arrayProto = Array.prototype
 4 export const arrayMethods = Object.create(arrayProto)
 5
 6 const methodsToPatch = [
 7   'push',
 8   'pop',
 9   'shift',
10   'unshift',
11   'splice',
12   'sort',
13   'reverse'
14 ]
15
16 /**
17  * Intercept mutating methods and emit events
18  */
19 methodsToPatch.forEach(function (method) {
20   // cache original method
21   const original = arrayProto[method]
22   def(arrayMethods, method, function mutator (...args) {
23     const result = original.apply(this, args)
24     const ob = this.__ob__
25     let inserted
26     switch (method) {
27       case 'push':
28       case 'unshift':
29         inserted = args
30         break
31       case 'splice':
32         inserted = args.slice(2)
33         break
34     }
35     if (inserted) ob.observeArray(inserted)
36     // notify change
37     ob.dep.notify()
38     return result
39   })
40 })
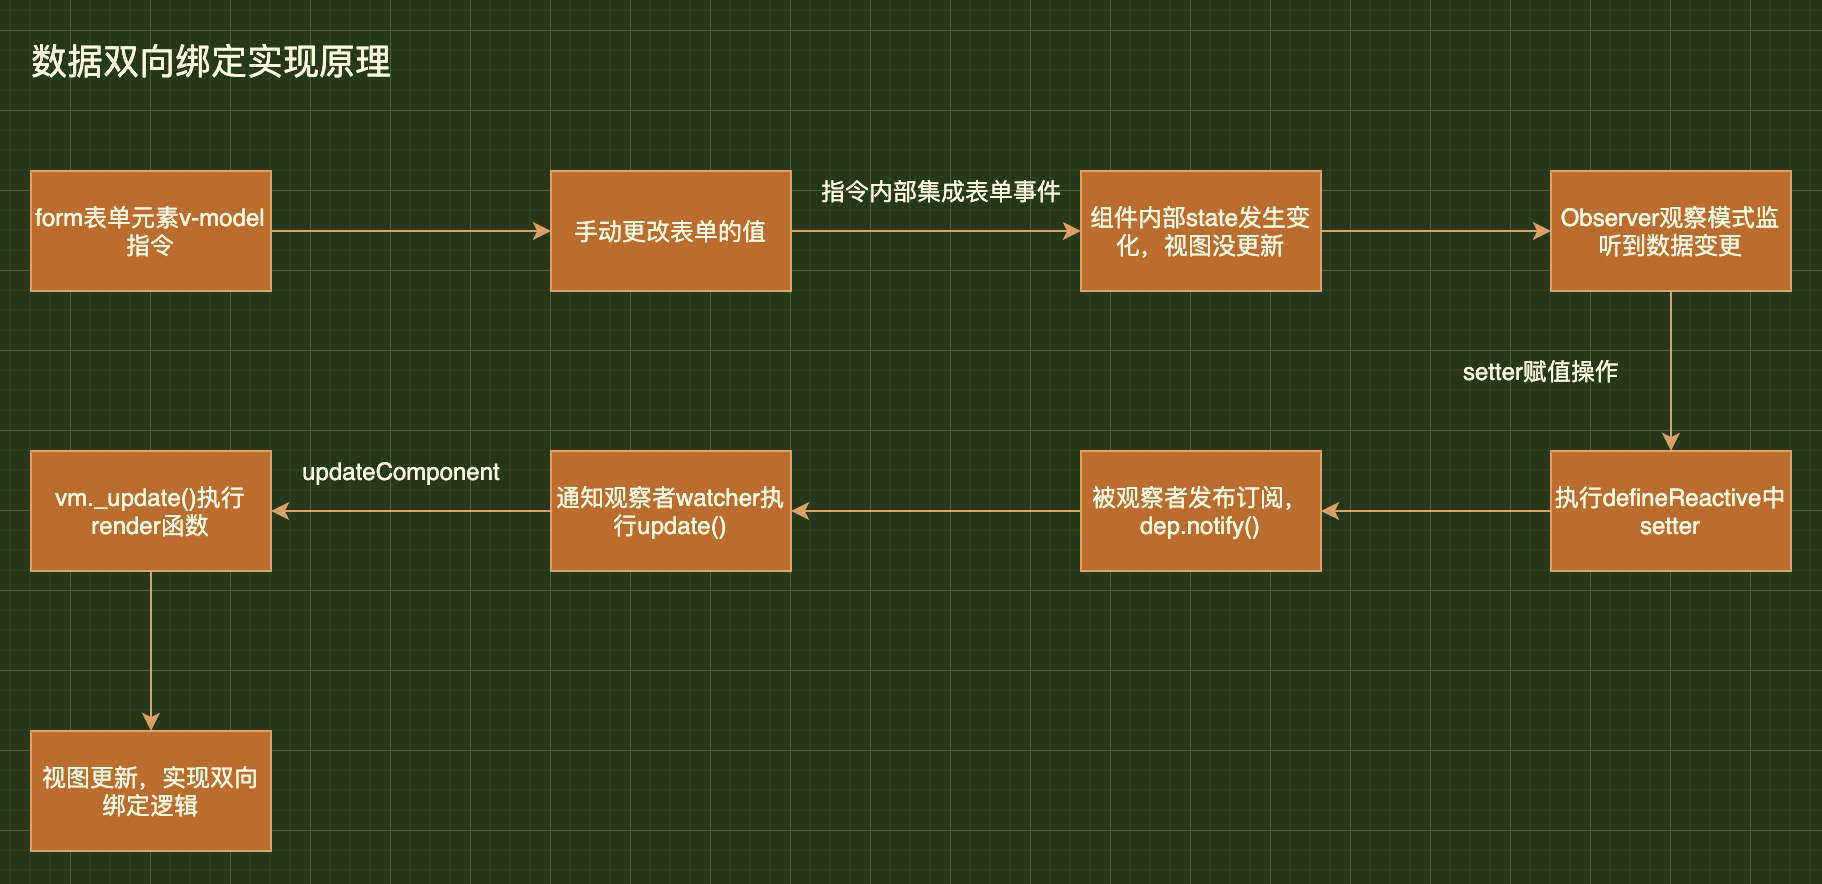
实际上,就是通过观察者模式,对数据更新的过程做了一次通知,即37行ob.dep.notify()。这里其实复用了Vue中使用观察者模式实现双向绑定中的代码。双向绑定的流程大概介绍如下图:

这里即通过notify通知各个watch进行updata。
notify的过程可以参看同文件夹下的dep.js,我们可以定位到如下代码:
 1   notify () {
 2     // stabilize the subscriber list first
 3     const subs = this.subs.slice()
 4     if (process.env.NODE_ENV !== 'production' && !config.async) {
 5       // subs aren't sorted in scheduler if not running async
 6       // we need to sort them now to make sure they fire in correct
 7       // order
 8       subs.sort((a, b) => a.id - b.id)
 9     }
10     for (let i = 0, l = subs.length; i < l; i++) {
11       subs[i].update()
12     }
13   }
14 }
这里其实就是对各个观察者进行通知,调用update():
 1   update () {
 2     /* istanbul ignore else */
 3     if (this.lazy) {
 4       this.dirty = true
 5     } else if (this.sync) {
 6       this.run()
 7     } else {
 8       queueWatcher(this)
 9     }
10   }
抛开一些其他判断和细节,这里下一步我们的主要过程实际上就是进入run():
 1  run () {
 2     if (this.active) {
 3       const value = this.get()
 4       if (
 5         value !== this.value ||
 6         // Deep watchers and watchers on Object/Arrays should fire even
 7         // when the value is the same, because the value may
 8         // have mutated.
 9         isObject(value) ||
10         this.deep
11       ) {
12         // set new value
13         const oldValue = this.value
14         this.value = value
15         if (this.user) {
16           const info = `callback for watcher "${this.expression}"`
17           invokeWithErrorHandling(this.cb, this.vm, [value, oldValue], this.vm, info)
18         } else {
19           this.cb.call(this.vm, value, oldValue)
20         }
21       }
22     }
23   }
这里第三行是关键处,在执行run()方法中的get()时。继而会调用当前watcher中的getter()方法,这里就是之前初始化时传入的updateComponent(),执行render函数重绘视图。
继续进入get():
 1  get () {
 2     pushTarget(this)
 3     let value
 4     const vm = this.vm
 5     try {
 6       value = this.getter.call(vm, vm)
 7     } catch (e) {
 8       if (this.user) {
 9         handleError(e, vm, `getter for watcher "${this.expression}"`)
10       } else {
11         throw e
12       }
13     } finally {
14       // "touch" every property so they are all tracked as
15       // dependencies for deep watching
16       if (this.deep) {
17         traverse(value)
18       }
19       popTarget()
20       this.cleanupDeps()
21     }
22     return value
23   }
可以看到关键就是getter(),这里和双向绑定的响应式一样,Vue通过getter的劫持,从而更新界面。
第六行的value = this.getter.call(vm, vm)
this.getter 对应就是 updateComponent 函数,这实际上就是在执⾏:
vm._update(vm._render(), hydrating)
从而实现组件更新。


